I remember the exact Tuesday afternoon the ground shifted beneath my feet. I was sitting in a drafty studio in Brooklyn, overseeing a product shoot for a mid-sized beverage brand. The meter was running—literally. We were paying for the space, the lighting technician, a prop stylist who was meticulously rearranging condensation droplets with a pair of tweezers, and a photographer whose day rate could have bought a used Honda Civic.
We were six hours in, and we had exactly four “hero” shots. Four.
The marketing director turned to me, stressed out of his mind, and asked, “Can we get this bottle on a beach at sunset? And maybe one in a snowy cabin window?”
I looked at the concrete floor and the artificial lights. “Sure,” I said. “That’ll be another two days and about ten grand in travel and location fees.”
He sighed. We scrapped the idea.
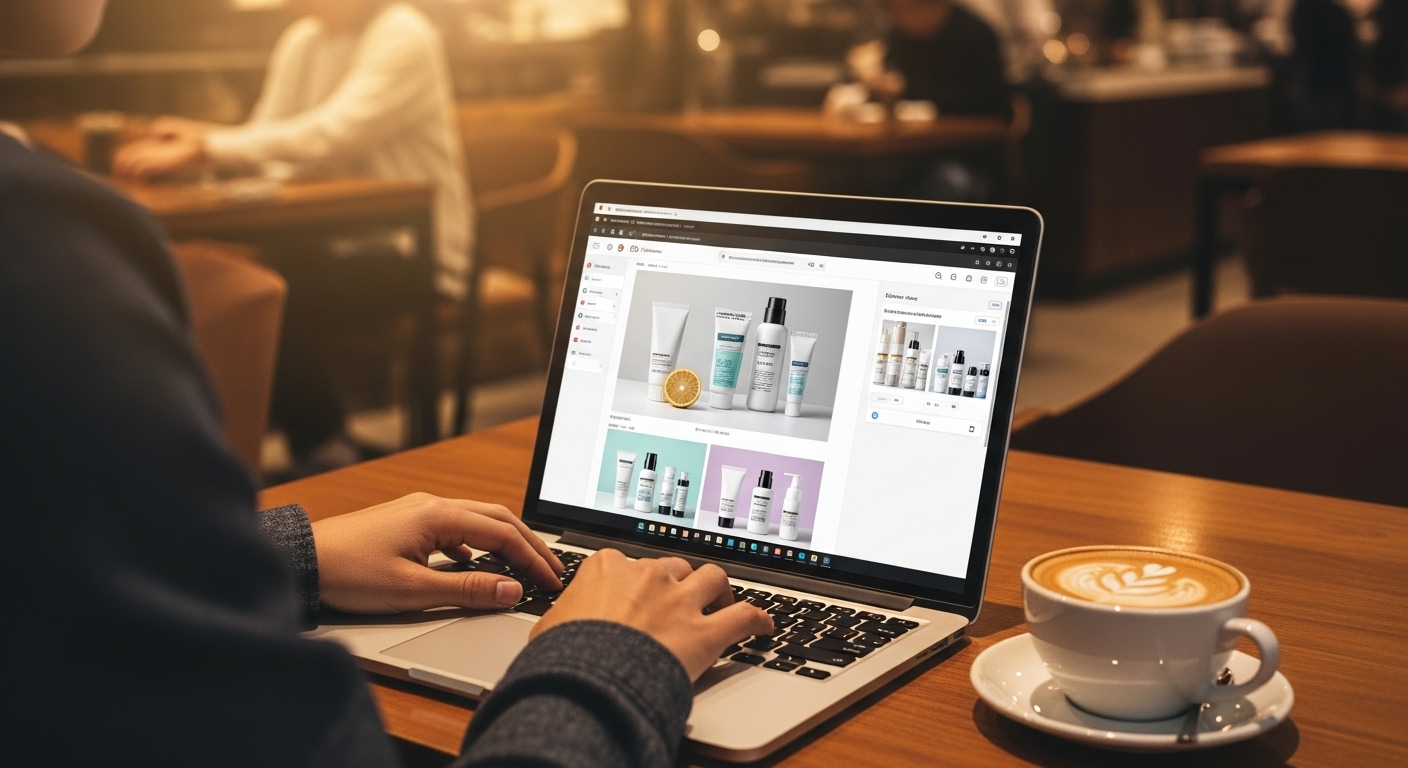
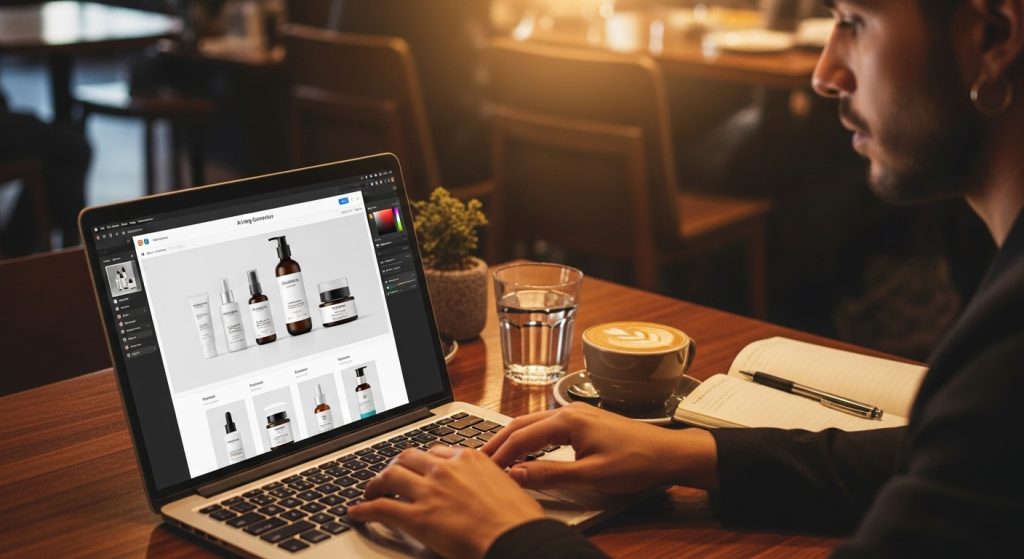
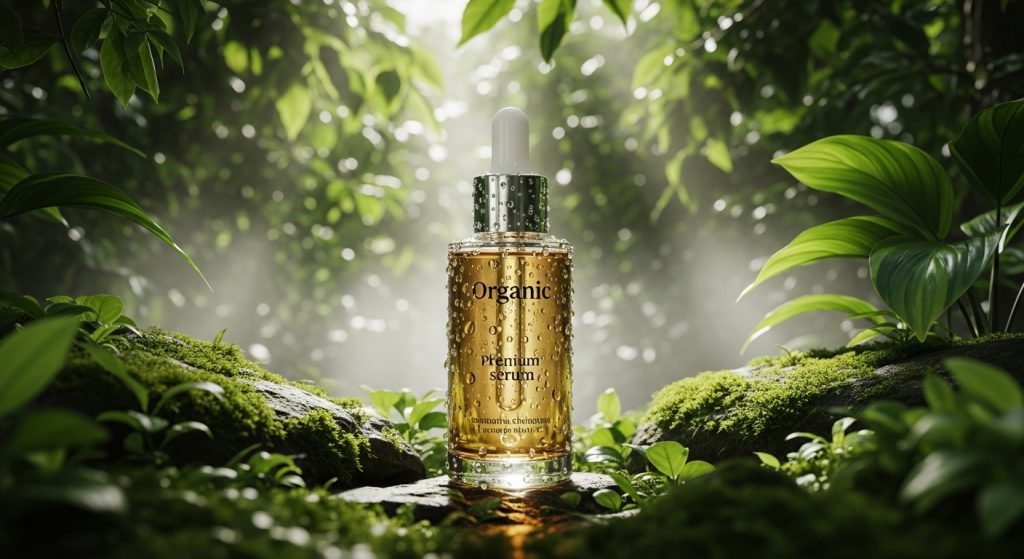
Fast forward to last week. I sat in a coffee shop with my laptop, sipping a flat white. Using an AI image generator for ecommerce products, I produced 50 high-resolution, on-brand lifestyle shots for a client’s organic skincare line. I put their serum in a rainforest, on a marble vanity in Paris, and floating in a zen water garden. Total cost? A $30 software subscription and two hours of my time.
If you think you can upload a photo and type “make it look cool,” you’ll end up with garbage. You’ll get six-fingered hands, defying-physics shadows, and products that look “melted.” To actually use generative AI for retail, you need a workflow that blends traditional photography principles with prompt engineering.
In this deep dive, I am going to pull back the curtain on my entire process. I’ll share the tools that actually work, the ones that are snake oil, and the specific workflows I use to generate commercial-grade imagery that converts.
Part 1: The Core Problem (And Why “White Background” is Dead)
For the last decade, the Gold Standard of e-commerce was the pure white background (RGB 255, 255, 255). Amazon demanded it. Google Shopping is optimized for it. It was clean, clinical, and utterly devoid of emotion.
While you still need that white-background “pack shot” for the product page gallery, it is poison for social media. Humans buy with their limbic system—their emotions. We don’t buy a candle; we buy the feeling of a cozy Sunday morning. We don’t buy running shoes; we buy the fantasy of being an athlete.
The barrier has always been Asset Velocity.
In 2018, if you wanted to test whether your product sold better with “urban vibes” or “nature vibes,” you had to shoot both. That’s expensive. Today, asset velocity is the single most significant competitive advantage in e-commerce. The ability to test 20 different visual hooks in a single day allows you to fail fast and find the winner before your competitor has even booked a studio.
This is where the AI image generator for e-commerce products stops being a toy and starts being a business engine. It decouples the product from the environment.
Part 2: The Tech Stack (What Actually Works)
I have tested everything. I have burned through credits on DALL-E, Midjourney, Stable Diffusion, and a dozen “wrapper” apps. Here is the reality: generic AI art tools are terrible for e-commerce.
Why? Because they hallucinate.
If you ask Midjourney to generate “a can of Coke on a table,” it will give you a beautiful image of a red can that looks like a Coke can, but the logo will be misspelled, the font will be wrong, and the shape might be slightly off. In e-commerce, product fidelity is non-negotiable. If the customer receives a product that looks 5% different than the photo, you are going to get hit with returns and chargebacks.
Here is the professional stack I recommend, categorized by skill level.
Level 1: The “Wrappers” (Speed & Ease)
- Tools: Photoroom, Pebblely, Flair.ai.
- How they work: These apps are built specifically for product photography. You upload a transparent PNG of your product. The AI “locks” the product pixels so they don’t change, and then generates the background around them.
- My Take: Photoroom is currently the king of mobile processing, while Flair.ai is incredible for drag-and-drop web styling. I use these for 80% of “quick turn” social content. They understand scale and basic lighting matches.
Level 2: The Power User (Control & Compositing)
- Tools: Adobe Photoshop (Generative Fill) + Midjourney.
- How they work: I use Midjourney to generate high-quality background assets (e.g., “a rustic wooden table surface, top down view, soft morning light”). Then, I bring that background into Photoshop and composite my product photo on top using Generative Fill to blend the shadows and reflections.
- My Take: This yields the highest quality but requires Photoshop skills. You have to understand horizon lines and perspective.
Level 3: The Architect (Total Freedom)
- Tools: Stable Diffusion (Automatic1111 or ComfyUI) with ControlNet.
- How they work: This is the deep end. You run the AI locally or on a cloud GPU. ControlNet is a game-changer. It allows you to feed the AI a reference image of your product and say, “Keep the edges and geometry exactly like this, but change the texture, lighting, and environment.”
- My Take: If you are an agency, you need to be here. This allows for things like “virtual try-ons,” where you can map a t-shirt onto a generated model without distorting the logo.
Part 3: The Workflow – From Boring to Breathtaking
Let’s walk through a real project I did recently for a coffee brand. We needed to launch an “Autumn Blend” campaign, but it was July, and we had zero budget for a location shoot.
Step 1: The Source Image (Garbage In, Garbage Out)
The biggest mistake I see beginners make is using a bad input photo.
- The Rule: Shoot your product in flat, soft lighting.
- Why: If your product photo has a harsh shadow on the left side, but you ask the AI to put it in a scene where the sun is on the right, the brain will immediately spot the fake. The lighting won’t match. I usually shoot the product inside a light box or on a white table with diffused LED panels.
Step 2: Pre-Processing and Masking
I take the flat photo and remove the background. The auto-remove tools are good, but I often go in manually to clean up the edges.
- The Transparent Problem: If you sell liquids (perfume, whiskey, juices), AI struggles. It sees the transparent glass as “empty space” and tries to fill it with the background.
- The Fix: I keep the original “white background” version of the liquid on a separate layer in Photoshop. Once the AI generates the background, I set the liquid layer to “Multiply” mode, which allows the background colors to tint the liquid naturally without making it disappear.
Step 3: Prompt Engineering for Photorealism
This is where the magic happens. You cannot prompt like a writer; you must prompt like a photographer. The AI was trained on millions of photos, many of which had metadata regarding camera settings.
- Bad Prompt: “Coffee bag on a table with autumn leaves.”
- Result: A cartoonish, oversaturated image.
- Pro Prompt: “Commercial product photography, eye-level shot of a coffee bag standing on a weathered oak table, surrounded by scattered dried maple leaves, soft window light coming from the left, bokeh background, shallow depth of field, 85mm lens, 8k resolution, cinematic lighting, raytracing, realistic texture.”
Key Terms to Use:
- Bokeh: Blurs the background to make the product pop.
- Global Illumination: Ensures light bounces correctly between objects.
- Caustics: Crucial for glass/liquids (how light refracts through apparent objects).
- Subsurface Scattering: Crucial for candles or skin (how light penetrates translucent surfaces).
Step 4: The Iteration Game
I hit “Generate,” and I get four options. Usually, three are terrible.
- In one, the table leg is floating.
- In another, the AI added a coffee cup that looks like it’s melting.
- In the third, the perspective is tilted.
- The fourth one is 90% there.
I take that fourth image. I don’t settle. I use “Inpainting.” This is a feature where you highlight a specific part of the image (like the weird melting cup) and tell the AI, “Regenerate just this spot.” I scrub out the cup and replace it with an “antique brass spoon.” Boom. Fixed.
Step 5: Post-Production (The Human Polish)
No AI image is ready straight out of the oven. They often have a plastic, overly smooth sheen.
- Grain: I add a 2-3% monochromatic noise layer in Photoshop to mimic film grain. This breaks up the digital smoothness and adds “tooth” to the image.
- Color Grading: AI tends to hallucinate colors. I always apply the brand’s specific LUT (Look Up Table) to ensure the greens match their brand palette.
- Logo Re-Application: Even the best AI distorts text. I always overlay the original high-res PNG of the logo back on top of the product to ensure it is crisp and readable.
Part 4: Case Studies (ROI in the Real World)
Let’s look at three distinct scenarios where an AI image generator for ecommerce products didn’t just save money—it saved the business.
Case A: The Dropshipper (Budget < $100)
The Scenario: A client was launching a niche store selling ergonomic desk accessories. They were sourcing from multiple suppliers. The supplier photos were inconsistent—some on white, some on grey, and some low-res. The store looked messy and untrustworthy.
The Solution: We used Photoroom to bulk-remove all backgrounds. We created a “Brand Style” prompt: “Minimalist Scandinavian office desk, bright daylight, potted succulent in background.”
The Result: We processed 400 SKUs in two days. The store looked cohesive, like a high-end boutique. Conversion rate jumped from 1.2% to 2.8% within a week of the image update. The consistent visual language built trust.
Case B: The Furniture Retailer (Logistics Nightmare)
The Scenario: A sofa manufacturer wanted to show their new velvet couch in five different living room aesthetics: Modern, Boho, Industrial, Farmhouse, and Art Deco.
Traditional Cost: Renting five different locations, moving a heavy sofa five times, and hiring stylists. Estimated cost: $15,000+.
The AI Solution: We used a 3D render of the sofa and Stable Diffusion with ControlNet. We kept the sofa geometry locked. We prompted the environment around it.
The Challenge: The lighting. We had to match the virtual room’s shadows to the lighting in the sofa render. We generated shadow passes specifically to “ground” the sofa so it didn’t look like it was floating.
The Result: Total labor cost was under $1,000. They launched the product with targeted ads—showing the “Industrial” image to men aged 25-40 and the “Boho” image to women aged 25-40. CTR (Click Through Rate) doubled because the image matched the user’s personal aesthetic.
Case C: The Beauty Brand (Texture is Everything)
The Scenario: A skincare brand needed texture shots—swirls of cream, droplets of oil.
The AI Solution: This is where AI struggles. It often makes cream look like plastic or yogurt.
The Hybrid Approach: We photographed real “smears” of the product on a glass plate. We then used AI to generate the environment under the glass. We placed the glass plate over a generated image of “crushed lavender and silk.”
The Result: Real texture, AI environment. The best of both worlds.
Part 5: The “Gotchas” – Where AI Fails
I want to be balanced here. If you rely solely on AI, you will get burned. Here are the current limitations you need to navigate.
1. The “Six Finger” Problem:
AI still hates hands. If you want a model holding your product, be prepared for pain. The fingers often blend into the product, or the grip looks unnatural.
- My Workaround: I photograph my own hand holding the product in the correct lighting. I mask it out and composite it into the AI scene. It’s the only way to get it 100% right.
2. Text and Labels:
While models like Ideogram and DALL-E 3 are getting better at text, they are not perfect. They will misspell “Ingredients” as “Ingredents.” Never rely on AI to generate the text on your packaging. Always overlay your real label file.
3. Resolution Limits:
Most generators output at 1024×1024 pixels. This is fine for Instagram, but too small for a desktop hero banner.
- The Fix: You must use AI Upscalers. Tools like Topaz Gigapixel or Magnific AI can take that 1k image and blow it up to 4k or 8k while adding realistic detail. Do not skip this step, or your images will look blurry on Retina displays.
4. Consistency:
It is tough to get the same “fake” room twice. If you want a series of shots that look like they were taken in the same house from different angles, AI struggles to maintain spatial consistency. You have to treat every image as a standalone piece of art.
Part 6: The Ethical & Legal Landscape
This is the conversation we need to have. Just because you can do it, should you?
There is a fine line between “styling” and “deceptive advertising.”
The Golden Rule: You can fake the environment, but you cannot fake the product.
- Okay: Putting your hiking boots on a mountain peak when they were shot in a studio.
- Not Okay: Using AI to remove the glue marks on the sole of the shoe or changing the leather texture to look smoother than it actually is.
If a customer buys your product based on the image and the physical item turns out to be lower quality, you have failed. You are setting yourself up for returns and bad reviews.
I also advise my clients to be transparent. There is no shame in using AI. In fact, tech-savvy audiences often appreciate the creativity. Adding a small note in the footer or caption like “Creatively styled with AI” protects you from accusations of faking it.
Copyright:
Currently, in the US, you cannot copyright purely AI-generated images. This means if you generate a cool background, technically, a competitor could take it. However, if you composite your product (which you own) into it and do significant Photoshop work, you have a stronger claim to that specific composition. Disclaimer: I am a creative director, not a lawyer. Consult one if you are worried.
Part 7: The Economics of the Shift
People ask me, “Is this killing photography?”
I believe it is killing commodity photography. The days of paying a photographer $500 to shoot a white bottle against a white wall are over. A robot can do that faster and cheaper.
However, it is elevating creative direction. The money that brands used to spend on travel, location permits, and catering is now being shifted. Where does it go?
- Better “Source” Photography: Since the AI output relies on the input, brands are spending more to get perfect, high-res, professionally lit studio shots of the product itself.
- AI Specialists: There is a massive demand for people who know how to drive these tools. A prompt engineer who understands lighting and branding is worth their weight in gold.
For small businesses, this is the great equalizer. A mom-and-pop hot sauce brand can now have marketing assets that look just as expensive as Tabasco’s. It democratizes the visual playing field.

Part 8: Future Gazing – Video and 3D
If you think static images are impressive, buckle up. We are currently standing on the precipice of the AI Video revolution.
Tools like Runway Gen-2 and Pika Labs already let us animate these static product shots. I can take that still image of the coffee on the table and tell the AI, “Make the steam rise, make the leaves rustle, and make the sunlight shift across the bag.”
Within 12 to 18 months, we will see “Text-to-3D” become commercially viable. You will upload a few photos of your product, the AI will build a perfect 3D model, and then you will be able to drop that model into entirely generated video commercials.
Imagine typing: “30-second commercial, cinematic drone shot, swooping over a glacier, my energy drink can rises from the ice, lightning strikes it, energetic music.” And having it render in minutes. That reality is closer than you think.
Conclusion: Adapt or Fade Away
The AI image generator for e-commerce products is not a trend. It is a fundamental shift in the infrastructure of digital retail.
It allows for hyper-personalization. You can show a different image to a customer in Miami (sunny, beach background) than to a customer in London (rainy, cozy indoor background) for the same product, in real time.
For the creative professionals reading this: Do not fear the tool. Master it. The photographer who refuses to use Photoshop is a relic; the photographer who refuses to use AI will soon be the same.
For the business owners: Start small. Pick your best-selling product. Sign up for a trial of a tool like Flair or Photoroom. Spend a Sunday afternoon playing with prompts. Learn the language of light.
The barrier to entry has never been lower, but the ceiling for creativity has never been higher. The brands that win in the next five years won’t necessarily be the ones with the most significant budgets—they will be the ones with the best imaginations.
Welcome to the new darkroom. It’s entirely digital, infinitely expansive, and open for business.